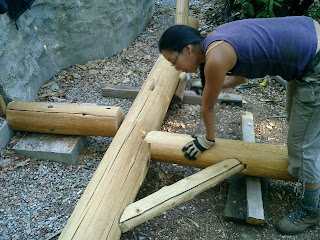
The Puzzle is going together!
We got the half the upper beam onto the lower beam/post set up. That one upper beam (the log on the left side of the photo) weighs about 600 pounds, and has a taper and two kinds of curve. Melissa did all the markings to compensate for that, and sure enough, it fits together. Took us most of one day to get it this far.
The brown-eyed boys were happy the logs fit together.
Tuesday, September 30, 2008
Friday, September 26, 2008
Working it together
As we piece together this center bent, we're starting to see it take shape and feel like we're moving forward.
In this picture, you can see some of the sort of 'cribs' we have to build to hold up the posts and beams, and you can see the stem wall, which is what we have to work around.
First we're putting on the lower beams, and then we'll cap the posts with the upper beam, parts of which are laying on the left of the photo.
Wednesday, September 24, 2008
Another Refinish job done
While these pictures don't do a good job of before and after, I'm really happy with the way this turned out. This coffee table was the main piece in my parent's living room, and I know they owned it before I was born. It used to be blue, and my mother had done the paint stripping and first refinishing. I had to refinish it from the water damage from this summer's floods in WI.
The lower shelf had cracked and had a lot of water stains, as did the lower bits of the legs, even though you can't tell from the above 'before' picture.
Anyway, it looks really good now, and will go back in storage until our living room is done.
Tuesday, September 23, 2008
Mike and Heidi Came to Visit!
so of course I put them to work:
The first project was getting the dome off the top of the yurt and washing it, which wasn't too hard.
Until we cracked it! Mike and I figured out a patch with some extra acrylic and superglue,
and then when Mike put it back up, he added some extra caulk as well.
Project number two was bread and pizza baking, and I got them to do the dough kneading:
Heidi actually did most of the work.
Mike just sort of concentrated on the little timer dealy.
and we had great meals and fun all weekend!
Friday, September 19, 2008
More Clean up and organizing
Melissa has been doing a great job of going through the old Wisconsin stuff and deciding what needs to be saved and what can be tossed. She actually checked with me on all the photos and slides from Dad's collection, and we kept a bunch. Here's a photo of the seven (7!) boxes of photos (the slides were another 4 or 5) that we tossed.
I'm going to change my shirt soon.
Sunday, September 14, 2008
Log Lifter
I keep telling people I learned about this from youtube, and I keep discribing it to people, so here's a photo. By having a double fulcrum, we can easily 'teeter-totter' the log back and forth, adding to the fulcrum when it's off one side. This easily and quickly raises the log that would be way too heavy for normal moving around.
still moving those trees around...
We continue to check joints throughout the 'bent', which takes a long time due to the sizes of logs we're working with, and the surface area we're on.
It takes two of us to move one of the logs into position, to shove it in the notch, and sometimes we're at strange angles, such as Melissa here working down the hill while we checking a particularly long one.
Within the house foundation, we have to build a sort of scaffolding for the logs, so as to have them reach over the foundation walls AND be all on the same plane, to check those notches. This sometimes takes some acrobatics.
Friday, September 05, 2008
re-doing Counters
yup, already needing to re-do stuff that was first built less than 2 years ago. Well, things like wood furniture need work regularly, and stuff that was fresh wood needs even more care. I re-oiled the 'kitchen' counters with tung oil, and by gosh, they look pretty good.
this is the island by the door.
Monday, September 01, 2008
Building like it's summer of '99... 1699.
We had to create a new knee brace due to some miscalculations, so I got back on the chisels with my self-designed sawhorse and log holder... it is nice to work with the old fashioned tools.
Melissa got back into math mode to re-calculate what was needed. Here you can see how we have to put each joint together, then pull them apart and test the next section. that's a lot of lumber moving around.
Subscribe to:
Posts (Atom)
Design Mistakes in my cob house
So, I have long meant to create a list of mistakes I made when designing the finishings on our house. Now that we've lived in it for a ...
-
Diagram of ...progress? Well, if nothing else, you can see that the grass is growing on our new slope, holding in the dirt during the rains....
-
Still Pegging, Brackets. All the pegs are in now, and in some cases I still have to go back and saw off the ends. Sort of debated about leav...