More Rafter Magic!
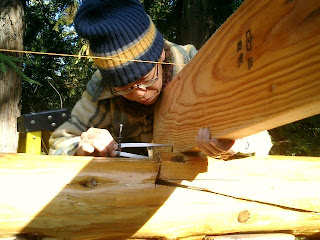
It was an interesting puzzle to figure out how we were going to get the rafters around the posts (as they don't line up exactly so you can put rafters 24inches apart from each other) so we figured out that we could notch into the post itself.
You can also see the little tester 2x4 that's in the 'ladder notch'. There will be 2x4s making a ladder with that big 2x10 running down the middle of it. This helps hold up the eaves.
Saturday, December 27, 2008
What the Rain Brings....
I'm now obessed with mushroom hunting, and we had some success right after getting back from Christmas dinner down in San Jose.
These are Honey Mushrooms, which I never saw up here before, but suddenly, we've got tons. After doing a careful spore-print test and eating a few to see if they upset our stomachs,
we cleaned all these and have them on racks drying in the oven. This is in addition to the batch of Boletes Melissa got a couple weeks ago. Wilderness gourmet, here we come!
Sunday, December 21, 2008
Melissa the meticulous
To get the rafters to all be the same height (which is important to have an even roof) we use a scribe to trace the beam arc into the rafter to make the notch cut.
It's a lot harder than it looks, because the beam is all lumpy and tapered and not as exactly straight as we would like it to be, each notch is a different width... and figuring out what that should be for each end of each rafter is a chore.
Friday, December 19, 2008
Rafters in Snow
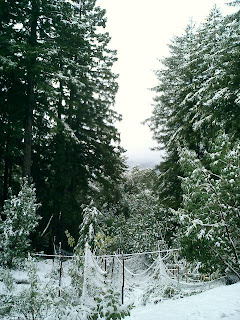
Even though the snow was sticking around, and still looking very nice,
We're starting to get a bit better at putting up rafters, and got a few more on. You can see Melissa in this photo checking measurements twice, as we need to cut a notch out of each end of each rafter that corresponds to the arc of the beam logs, which are also at different heights.
It's where the organic meets the factory-made slow, difficult process.
Tuesday, December 16, 2008
Friday, December 05, 2008
Humanure Update
A lot of people are surprised/freakedout by our composting toilet set up, and I enjoy showing folks how well it works. I've recently started to add a lot more green to the active pile, as I'm learning more about how to manage compost.
Here you can see the active pile, with a layer of green Madrone leaves chopped up and put on top, before I empty a bucket on it.
I get the green leaves from my 'timberland management area'... I had an epiphany a while ago and realized that I can 'manage' all these saplings growing out of old madrone stumps throughout our property. Probably 4 years ago, someone came through and took a ton of madrone trees out for firewood. The stumps are still there, and have been shooting up saplings.
Here's a photo on one patch. The stump is in the middle of those handful of young trees.
Here you can see the active pile, with a layer of green Madrone leaves chopped up and put on top, before I empty a bucket on it.
I get the green leaves from my 'timberland management area'... I had an epiphany a while ago and realized that I can 'manage' all these saplings growing out of old madrone stumps throughout our property. Probably 4 years ago, someone came through and took a ton of madrone trees out for firewood. The stumps are still there, and have been shooting up saplings.
Here's a photo on one patch. The stump is in the middle of those handful of young trees.
I cut one (or more, depending on where and how I want to manage the shade and sunlight situation) and drag it over to the compost area.
I then pull or cut off all the green leaves for the layers in the compost pile,
and after that's done, I chop up all the small branches into fireplace sized sticks. (see the finished pile on the left?)
I then pull or cut off all the green leaves for the layers in the compost pile,
and after that's done, I chop up all the small branches into fireplace sized sticks. (see the finished pile on the left?)
Then the big trunk gets cut up, then split,
Then stacked by the hot tub for future soaking pleasure. Here you can see the young stuff stacked on the left.
Monday, December 01, 2008
Roof mock-up
Before we left for Thanksgiving, we were still worried about the beams getting wet in possible rain, so we put up the big tarps, and managed to figure out how to get them over the two southern beams.
I noticed that it basically looks like what the roof will look like, so I stepped out across the meadow (to the south of the house) and took this picture. It looks low and long, but check out the ladder on the far left. It's stand at about 10ft high.
Garden Shed
Did I mention I built a little shed the other day? Since we had all this pretty good wood from our crib building days, in between things I tossed together this little shed for garden tools. It's made of entirely free wood, except for the one piece of plywood for the roof.
I wasn't going to do the tools on pegs, but once I got the thing together, I couldn't resist.
The door hinges are single pieces of madrone, maybe 1/2 an inch thick. They seem to work pretty well.
Thursday, November 27, 2008
Last Peg Going In!
It's official: we're done with the timber frame for the roof. (there will be a bit more notching and pegging for the loft) It was much more labor-intensive than I first expected, but all in all, worked out as well as we'd hoped.
After hand shaping something like 150 pegs, this one on the west center tallest post was the last one to go in. We wrote the date and our names on it, though I hope no one ever sees that.
The final southern bent and the girts to connect it took 50 pegs, and we did all the drilling, pounding, and cutting off in just two days.
The tarps are up on parts of the structure as it was threatening rain all week.
Starting to get a bit colder
As the days and nights turn colder, we're getting ready for winter. Jack isn't so sure he likes Melissa's help with that though.
In an interesting 'local food' twist, Melissa has gotten onto a wild tea leaf collecting and drying kick. Here's some of the many different kinds of leaves she's gathered on advice from 'Native Plants and Foods of California', a book we got from the library.
I think the biggest pile is blackberry leaves!
Thursday, November 20, 2008
Work goes on, but slowly
Melissa has been doing most of the varnishing, now that we've done the bug spray twice over, and it looks like we've beat the weather enough that there isn't a huge scramble to get some coverage on the beams before a rain.
In the meantime, I started doing some clearing of brush down below the yurt, now that I'm getting comfortable with 'managing the wild' (a book I'm reading about California native peoples and how they worked the land for food and life)
Melissa has been doing most of the varnishing, now that we've done the bug spray twice over, and it looks like we've beat the weather enough that there isn't a huge scramble to get some coverage on the beams before a rain.
She is the careful meticulous one, and I still have pegs to make for the south bent. I can't believe the structure still needs 50 more pegs.
In the meantime, I started doing some clearing of brush down below the yurt, now that I'm getting comfortable with 'managing the wild' (a book I'm reading about California native peoples and how they worked the land for food and life)
So I was cutting down a batch of hazelnut bushes, and decided to make my next compost pile bin in a more traditional manner. It's not that hard to get them bent together, and it's not that hard to cut them down, but collecting the good ones and dragging them over to the spot you want to make the fence/bin is tiring.
Wednesday, November 12, 2008
And, Some Corrections
In the process of standing the last 'bent' up, we had to make some changes in where the bottoms of the posts landed on the concrete footings. Unfortunately, where I had placed the J bolts back a million years ago when we had the concrete poured was not correct.
Thus, we had to take them out.
We'll probably do some fancy drilling into the concrete with some powerful drill and either glue down new bolts or possibly just get some new-fangled screws.
Monday, November 10, 2008
Southern Bent moving up
Once we got this thing together, it wasn't hard to start moving it up. A neighbor came by yesterday and wanted to help, so we were able to get quite a ways up in the air. At the end of today, we're almost at 45 degrees.
It's starting to look like something with some structure now. Here's Melissa gathering lumber for the 'cribs' which hold up the logs as we're moving them up.
Thursday, November 06, 2008
Girts are up!
These girts, the horizontal ties that connect the 'bents' and add the much needed sheer strength to a timber frame, are up and in place.
Here's Melissa posing below the Southeastern one, which is the one that fell on me yesterday and knocked me to the ground. Yes, my head still hurts.
And here's the Southwestern one, fitted and waiting for the southern bent to come up and connect. They're at about level, it's the ground that's at a different height.
Working away
Melissa has been doing a great job removing the mold that showed up on the logs for the southern bent (how annoying that we have to peel them twice). The logs look so much better after she's done.
This is me drilling the last mortis hole of the whole assembly. We have to go back and fix stuff and do some more drilling (let alone the peg holes) but basically, this was the last one. finally.
Tuesday, November 04, 2008
Angry Blue Man moves Timber!
We're onto the southern 'bent', so that means checking each joint individually before putting it all together. It also means a lot of heavy lifting and pushing stuff around. Very tiring, but at least it's not raining.
Note all the annoying MOLD that is already setting up on the beam (what my foot is on). Melissa is now going back and scrapping that off, which really amounts to another round of peeling.
Friday, October 31, 2008
Acorns, the next side project
It's a big acorn year up here, apparently only happens about every 4 or 5 years, so I couldn't resist seeing if I could get some food out of them. We gathered up about 4 gallons or so, just from our property, and had them laying in the sun to dry, but now that it's raining, we've got them in baskets by the fire.
I read the book on the traditional method of leaching and grinding the flour, so more as that progresses.
Monday, October 27, 2008
Still Pegging, Brackets.
All the pegs are in now, and in some cases I still have to go back and saw off the ends. Sort of debated about leaving them stick out....
I'm still working on the brackets that bolt the posts to the footings. They need a bit of tweaking, and it turns out I don't have enough of the lag screws to do the job anyway.
A lot of people think that these brackets are to hold the posts up, but really, they're there to hold the post, the whole bent, *down* to the big concrete footing. It's earthquake protection for hopping, and moving from side to side. They wouldn't hold them if they wanted to topple over... but they won't do that as they are all hooked together... like a table with 15 legs.
Tuesday, October 21, 2008
Baking Day
We fired up the earthen oven today and got some baking for the week done. Lasagna, a pie (a prize for who can guess what kind) and yes, a whole wheat crust, four loaves of bread, two jars of garlic rosemary crackers, and a sugar cookie made from extra pie crust. Oh, and I have to go grab the small butternut squashes right now!
Started Pegging!
We've finally got everything in place to be able to start putting the hardwood pegs into the joints. After setting up three different winches to squeeze the joint, I climbed up and started drilling the 1" holes for the pegs today.
It's amazingly satisfying to pound those pegs through the log with my big wooden mallet. Only 68 to go!
Sunday, October 19, 2008
Finally Got a Container!
I tried getting one of these for about 6 months more than 2 years ago. (In fact, it might have been the very first blog entry) and today, my great neighbor, Misha, brought one over and helped me put it in place.
It came from Oakland, where he takes these boxes off the back of moving vans and then makes the truck into a dumptruck. I only had to pay his driver for his time. Misha GAVE me the box, and then brought over his tractor to help me move it into a good spot.
Tomorrow, Melissa and I will spend some time leveling it.
Here's Misha and Maxim, his dog, enjoying a litte food after the box got put in its place.
Apple Time!
I saw an ad on craigslist for 'horse apples' and thought the guy might be a good source for manure. Turns out he, as a seller of fine apples, can't make money from the ones that have fallen on the ground, and used to feed them to his horse. His horse is gone, and we hit it at just the right time. There were tons of perfectly good apples everywhere. We stopped picking because we were tired and out of bags, not because we couldn't find anymore.
They're almost entirely red delicious, and since I haven't built an apple press yet, and they don't make great cider anyway (so I'm told), we decided to dry them. I built a quick solar dehydrator out of some scrap lumber, some old curtins and a sliding glass door, and we started slicing.
We're going to dry a batch, then slice up another, and keep going until we're prepped for winter!
Subscribe to:
Posts (Atom)
Design Mistakes in my cob house
So, I have long meant to create a list of mistakes I made when designing the finishings on our house. Now that we've lived in it for a ...
-
Diagram of ...progress? Well, if nothing else, you can see that the grass is growing on our new slope, holding in the dirt during the rains....
-
Still Pegging, Brackets. All the pegs are in now, and in some cases I still have to go back and saw off the ends. Sort of debated about leav...