Saturday, July 24, 2010

Great Stuff

A vast majority of our house is 'all natural' and local and hand made, but we do want an efficient and bug proof home, so we do use some store bought products. This Great Stuff product is pretty cool. It's the expanding foam that ends up looking like, and acting like, insulation. We built our roof out of green lumber, and as it's shrinking as it dries, cracks between pieces are showing up.

By putting this foam into the cracks, not only are we making the ceiling more airtight, but making it a lot harder for the ants and termites to get in. In the photo, you can see the white goop in the cracks. It actually ages to a nice yellow, very similar to that blonde wood color.

Thursday, July 22, 2010

Windows turning blue

the first coat of the finish color are going on the windows... we don't have enough flat, clean areas to set them when their wet to do them all at once.

Wednesday, July 21, 2010

More Guests work!

Greg and Christine came up for a visit, and they wanted to get dirty, so we started some plaster experiments. It was great to have them help with this, as deciding on the right consistency was quite subjective... and fun.

We worked under where the kitchen counters will be, so it won't really matter what it looks like back there. Still, seems like it's going to look pretty good. Here's our different mixes drying out:
These were only the 'discovery coat' mixes, so there will be another finish plaster over the top of this. This layer is simply to smooth everything out.


Friday, July 16, 2010

The way to make a bench

We've still got some big chunks of boards that we set aside for indoor parts of the house. I started by gluing two 12 inch wide ones together:

The next day, the clamps come off and a bunch of hand planing gets done to take off the 3 years of aging and rough saw cut surface:


and then some very difficult cutting and shaping to get them to fit onto the organic earthen bench. I get now why they say to build the bench around the wood, not the other way.
These bench tops will get doors cut into them so that things can be stored inside the bench.

Wednesday, July 14, 2010

Progress on the windows

Now that Melissa did the sanding, to remove old paint, dirt and maybe mold, I put putty on all the cracks and holes, and glued bits of wood into the slots where the hinges used to be (they're the wrong kind of hinges, so I'll be putting different ones on later)

We then taped all the edges (both sides!) and I finally got one coat of a primer on them. It's actually some gray/tan paint that was given to us, and we figured it can't hurt to have a good base coat on there before putting on the finish color.. and we'll probably do a couple coats of that.

Monday, July 12, 2010

Triumphs and celebrations!

NOT only is this my 500th blog post, but we have reason to celebrate about construction and homesteading things!

First, Melissa has been tackling the tedious but important rigid foam insulation cutting and fitting in the ceiling. It's hard work. it's actually so hard, I can't do it, as my old back injury seems to be agitated by standing on a ladder and working over my head. When I started doing this stuff 2 or 3 weeks ago is when my back went out. still not right.

Anyway, Melissa was so beat, but we celebrated her finishing the main ceiling. You can tell she's tired in this photo, but the insulation looks great!

She got so beat that she had to take a break, and spent some time in the meadow just picking weeds to relax.


On another front, we had a HUGE scare that there was a problem with the well. A not-too-close neighbor just put in a well (downhill from us) and immediately after we heard about that well, our pump system stopped working. I, of course, was freaked out that the aquifer was over-tapped. However, I believe that what actually happened was our neighbor, who we share the well with, has a problem in his line, and when he tried pumping water, it messed up the electronic monitoring system of the well, and then it just kept shutting off - acting like there was no water down there.


Today I ran the system through a series of calibrations, and got it back to normal. So, we're back in the game. I don't usually do this (for free!) but the people at http://www.symcom.com/ , who made our pump electronic system, deserve a big star for service. I've called them numerous times freaking out about this issue, and their tech people helped out with good, solid advice. The peach tree thank you symcom.

Friday, July 09, 2010

Floors are Done! well, tube layer

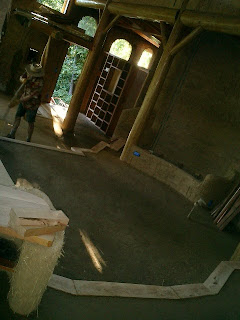
with another big round of heavy lifting, we've put cob in over the top of the tubes. This was normal 'cob' - clay, sand and straw, but not as much straw, and we cut up the straw a bit with a weed wacker before putting it in. In addition, the mix was much wetter, as it didn't need to hold a sculpted shape... so it was faster and easier to mix.

Still, glad it's over. Here's looking in the front door:

Again from the front door, looking west, into the house, you can see the shoe cabinet on the left, and the built in small bench across the living room:


Same shot, standing up looking through the whole house to the west. That's me, sweeping the kitchen floor.

Monday, July 05, 2010

Garlic and Paint

Melissa harvested all the garlic scapes the other day; these are the buds of the garlic flower, and if you pull them off at just the right time it helps the garlic bulbs grow bigger. And, they taste great sautéed! We ate them every night for a week.

And we've started in on prepping the windows to be painted the exciting color we've picked out. These wooden windows were given to us by friends who were remodeling, so we built our house with these windows in mind - so they'll fit. Melissa started enjoying the belt sanding work, so I wasn't going to stop her.

Thursday, July 01, 2010

More Tube view (mytube.com?)

part of the testing of the tubes after you lay them out is to pressurize them with air. The company we got our stuff from sent nice testers for this process, so we've been going through them, and I was told you could re-use the brass couplings between the PEX and the copper... well, that doesn't seem to be as accurate as I'd like.

We pumped up one run three different times, each time losing more than 10lbs overnight. (from 50) After worrying that we'd have to search for a pinhole leak, I finally switched up the pressure tester and it worked fine. In other words, it was most probably the joint at the PEX. and yes, I made sure to have good, clean tubes with no burrs and good, straight joints with well tightened nuts. Now I'm going to have to call the company and ask for new couplings.
Above you can see the 'tube test' area, which will eventually have the pumps and valves and the water supply. Note the bicycle pump on the left. We don't have a power air compressor, so we were doing it the old fashioned way, by hand.

In the meantime, work on the kitchen floor continues.

Shower pan goes in

Now that we have the tubes in, Melissa wanted to use mason mortar under the shower, in case there's ever a leak through the tiles. (we already have the pvc waterproof liner in place) She did the troweling out and determining the slope.

We mixed the mortar in the old wheel barrow, just as we had the other 245 80lb bags for the foundation. We were able to get the barrow into the hallway, so we didn't have to carry wet stuff too far.

Here you can see the mortar floor of the shower area meeting the mud floor of the rest of the bathroom. Things are smoothing out nicely!


Another shot of the shower floor, with the mortar all smoothed out and ready for tiles.

Design Mistakes in my cob house

So, I have long meant to create a list of mistakes I made when designing the finishings on our house.  Now that we've lived in it for a ...